There were the days that a supplier with a defect rate of 1% – or in other words 10,000 parts per million (PPM) – would be considered a good supplier. However, with the improvements in production and quality control capabilities, the expectations increased to 0.1% or 1,000 PPM. Today, we even talk about customer expectations of 25 PPM or 0.0025% in certain industries.
To deliver such low PPMs and increase the final delivery quality, manufacturers need to 1) ensure process stability and instant reaction to deviations, and 2) catch the defective parts that are nevertheless produced before they go into the batch. However, when we talk about high-volume production of complex parts, the inherent production instability and sensitivity to operational failures create major challenges in those two fronts – rendering conventional, sampling based, statistical process controls (SPCs) insufficient.
When Sampling Works: Stable Processes
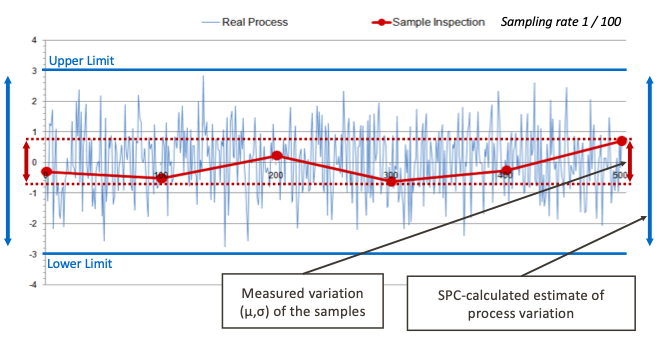
In order to understand why sampling doesn’t work, we need to first understand when it works. Sampling provides a reliable understanding of the process when the process is stable. Exhibit 1 compares the real process results (i.e. the measurements for each part produced) to SPC estimates. As seen in the image, the upper and lower limits that are based on the estimated process variance serve as reliable control parameters and provide a dependable evaluation for the process.

Exhibit 1: Sampling a stable process
When Sampling doesn't Work: Random Errors
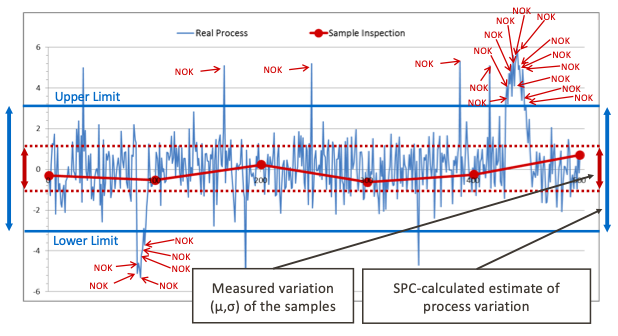
However, that is rarely the case. Think about a welding line that is prone to random errors due to, for example, tip wear. Every process has its inherent sources of variation and random errors. Especially in the case of complex parts and build operations, the inherent variation naturally increases. In such cases, sampling and SPC cannot provide the granular process monitoring capabilities that would prevent generating defective parts and help reduce PPM. Exhibit 2 demonstrates such a case.

Exhibit 2: Sampling a process with random errors
While the samples are within the upper and lower limits as calculated by SPC, the reality is much different. The process in fact generates defective parts due to random process errors. However, the defective parts generated – and hence the process errors – go undetected since the sampling scheme cannot provide the sufficient resolution.
Due to the lack of resolution, we are 1) not able to detect the defective parts and immediately sort them out before they cause a quality issue at a later stage of their journey, and 2) not able to see the actual performance of our process to identify and eliminate the error sources in order to prevent the production of defective parts in the first place.
When Sampling doesn’t Work: Trends
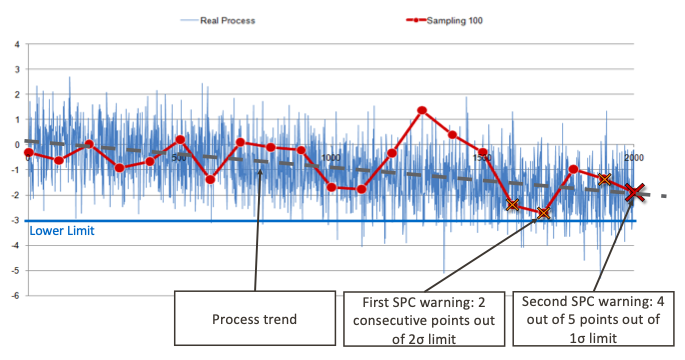
The case for random errors holds also true for systematic process deviations i.e. trends. Exhibit 3 shows a process with a negative trend. In the case of trends, the key question is when we can detect the trend the earliest before the process starts generating defective parts given its inherent variation.

Exhibit 3: Sampling a process with trend
From the sampling perspective, we would only notice that something wrong is going on with the process when we would start hitting the SPC warning limits; however, this information would not come with the immediate awareness of the root cause – that is the trend. Since sampling doesn’t provide sufficient granularity, we would not have sufficient data to observe and estimate the trend. What would happen is simply that we would get several SPC warnings until we would start taking corrective actions. However, if there would be sufficient granularity, then we would have the data to observe the underlying trend early on – despite the inherent variation – and immediately start taking corrective actions before producing defective parts; preventing an increase in PPM.
Summing Up The Case for Sampling
If we go back to our starting point, that is, the case for high-volume manufacturing with short cycle times; every minute a process issue remains undetected, it costs money due to waste of materials (scrap), waste of time (OEE – overall equipment effectiveness), and waste of human resources (e.g. manual sorting activities). Conversely, early detection of process issues saves money by eliminating waste. As manufacturing becomes faster, leaner, more agile, and more competitive – for example as in the case of the automotive industry; today’s manufacturers need a deeper understanding of their process capability in real-time.
100% x 100% In-line Inspection to Replace Sampling Schemes
As granularity becomes vital in fast-paced, high-volume manufacturing of complex parts; 100% x 100% in-line inspection provides the most in-depth understanding of your process capability by inspecting each feature on each part you manufacture even for the most complex parts with hundreds of features to be inspected – without compromising your cycle time. While inspecting each part enables you to achieve 100% delivery performance by proactively detecting each defective part; it also provides you instant, granular feedback on process performance for early defect awareness and advanced cell monitoring to optimize your manufacturing processes, increase process stability, and prevent generation of defective parts in the first place.
Moreover, having control over each part rather than only the sampled parts equips you with advanced capabilities such as advanced part traceability, retroactive inspection for your whole production, and advanced cell recognition to detect convoluted variation patterns and trends in complex production setups that consist of multiple lines and several cells.
More about 100% x 100% In-line Inspection
Learn more how 100% x 100% in-line inspection improves your process capability and delivery control here.
